Tiling your floor may seem daunting at first, but following some simple tips can help you create a beautiful and lasting look without the added cost of hiring an installer. You also get the chance to bask in the pride of having done it yourself.
Prep step
Hard tiles will eventually crack if they are not placed on a base that ensures stability. Cement board, at least 5/8" thick, is well-suited to this purpose. Lay down enough to cover your floor and then be sure to spread mortar in the joints (spaces) between the boards to create an even surface.
Batch match
When it comes to tiling, "nightmare" might be defined as making it halfway through a project when you suddenly realize that the package of tile you just opened doesn't exactly match the ones you've already installed. To avoid this, be sure to check that the shade or lot number is the same for all boxes of tile when you purchase them.
Placed without waste
Good tile isn't cheap, so if cost is a concern and you want to make the most of what you have, you're your layout so it uses as many full, and as few cut tiles as possible. In addition to saving money, you save time by foregoing the need to spend a lot of time measuring and cutting tiles to fit. When you must cut tile to fit smaller spaces, try to place it in an area where it will be hidden by furniture or less noticeable.
Start at center stage
Always begin tiling in the center of a room. To find your starting point, extend a chalk snap line from the midpoint of one wall to the midpoint of the wall directly across from it. Do the same from the midpoint of the other two walls. The point where the two lines meet indicates the center of your room. Begin tiling at the center point by laying tile along your chalk lines. This will help to ensure that the tiles needed for the outer edges of the room will be the same size.
Mortar order
To make easy work of mixing mortar to an even consistency, use a drill attachment designed for the purpose. Mix in small batches, never preparing more than you feel you can use in two hours' time. When mixing, give your drill a rest if it becomes hot so you don't burn out your motor.
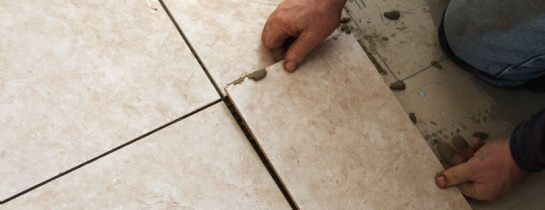
First things first
Lay your full tiles first, leaving about ¼" of space between them for grouting. Plastic spacers can be used to make the job of even spacing much easier. Tiles should be attached to the floor using thinset mortar and a notched trowel. After laying full tiles, wait a full day for mortar to set, and then begin installing tiles around the edges of the room. This will provide a solid surface on which to work while you finish the details. Ceramic tile can usually be cut to size using a tile cutter, but for harder materials such as marble, wet saw is better suited to the purpose.
About grout
Mix your grout in a bucket and then allow it to sit or "slag" for ten minutes before you begin applying it. Press grout into the joints between tiles using a rubber trowel, taking care to squeeze the excess from the tile surface as much as possible. Let grout sit for a moment or two and then use a large, flat sponge to wipe grout away from everywhere except for the joints.
Clean sheen
Grout will leave behind a chalky haze as it dries, and if this residue is not removed promptly, it can become hard to get rid of and have a dulling effect on your floor. Allow new grout to cure for 24-72 hours (check the packaging for cure times), and then then get ready to bring out the elbow grease. Begin scrubbing with a circular motion using cold water and a plastic scrubbing sponge. Be sure to rinse your sponge frequently with clear water. Dry the floor with a towel and then wait 15-20 minutes to see if the haze returns. If it does, you will need to finish the job with grout haze remover.
Haze daze
Grout haze remover releases harmful fumes, so be sure to open your windows and doors to ventilate your work area. You should also wear rubber gloves and a dust mask. Apply with a rag (taking care to avoid the grout in the joints as much as possible), and then buff using a separate cloth. When scrubbing is complete, mop the area using clean water to remove residue. Repeat the process if you find any trouble spots where grout haze has returned.
Seal appeal
Once you are satisfied that all of the haze has been removed, you will want to apply a quality sealant to most types of tile floors. This will help to protect porous floors from unsightly spills that could discolor them. Prep the surface for sealer using a 1 to 5 baking soda and water solution using a clean mop or cloth. After it dries completely, apply an even coat of sealer to the tile surface using a new paint roller. Apply a second coat after the first has dried completely. A third coat will provide even more protection and durability.
This brings us to the end of our tip-list. In many ways, tiling is like rhyming. You need to ensure harmony. Following the above tips will make sure you end up with symmetric, scintillating floors.
Posted by: Ahmed MuztabaSuggested Reading For You
Best of TrustedPros 2019 | Spotlight: Coco Tile Flooring
The team at Coco Tile Flooring has won the Best of TrustedPros for 2019. Their commitment to quality works mea...
Best of TrustedPros 2019 | Spotlight: Tile By Style
The team at Tile By Style has won the Best of TrustedPros for 2019. Their commitment to quality works means th...