
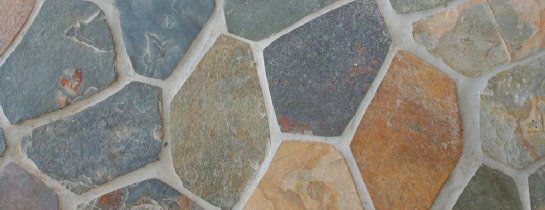
Stone has been the majestic building material for centuries building and today stone veneer can bring the aesthetic beauty of natural stone without the cost. Whether a homeowners desires the look of a manor house in the highlands of Scotland or a ranch house in the heart of the Rocky Mountains stone veneer can recreate the majesty in a fraction of the time that it took experienced stone masons to build the original structures. And just like natural stone the veneer products are waterproof and can withstand the freeze-thaw cycles.
Exterior veneers are not a new idea. After the widespread use of concrete replaced the brick as a building material, the brick-look carried on by adhering brick veneers to the concrete. This led to its widespread use in residential construction. Meanwhile, the labor-intensive, natural stone work was used exclusively for government structures and institutions that had the funds to show off grandeur.
Stone Veneers Gain Ground
Real stone has been used for veneers for many years however for construction work stone is heavy, fragile and expensive. Not only that the right stones have to be located, transported and shaped into a usable form.
The first imitators brought out plastic-based stone siding that looked like real stone. However, this product faded from UV rays over the years and could easily crack during the cold, Canadian winters.
Late in the last century building manufacturers brought out a Portland-cement-based called "faux stone," stone veneers that had the natural look and feel of natural stone. Actually a light-weight product made by casting cement, these stone veneers were shaped and coloured to take on the role of the real thing. Today, they are used for both the exterior and interior facings of a home. There are hundreds of choices and colours from which to chooses and the installation can be accomplished by masons or homeowners with do -it-yourself skills.
Stone Veneer Installation
Most manufacturers make two types of stone veneers:
- Stone to be installed with ½" mortar joints
- Dry-stacked.
The traditional look for most applications is an installation with mortar joints. This is especially true where the homeowner wants to recreate the appearance of a rock-faced building, limestone, stream-washed stones or a granite. Dry-stacking the stone veneers is easier for installation. There are also products that are made with an imitation mortar joint to get the look of a mortared-stone wall without paying the labor and material costs.
1. Estimating the Job
As with any household project, large or small, installing stone veneer requires estimating and planning. If there is not enough material this can stall the project until new product is brought on site. As with flooring and other patterned products new dye lots may not have the exact colouring so this can also complicate the job.
On the other hand, having too much product on hand can be costly because, depending on returns policy of the building supply depot, the excess material may have to be kept. Supply businesses that agree to take materials back usually charge 25% or more as a restocking fee.
Estimation Tips
- Find the surface area by multiplying the height by the width.
- The area of the doors, windows, fireplace area, etc should be subtracted.
- Jobs where corners are required should be measured in linear feet. The rule-of-thumb is that 1 linear foot of corner piece will cover ¾ of a square foot of surface and this can be subtracted from the surface area total.
- Trim and Molding: Windows, doors and other decorations can be framed with a "trim stone," which is a decorative border. This should also be measured in linear feet and subtracted from the total.
-Always buy 5% more in case of breakage.
2. Tools
Installing stone veneer takes specialized tools. These can be rented or bought and kept for other projects:
- mason's trowel
- hock and trowel
- margin trowel
- level
- brick hammer
- ceramic nippers
- staple gun (for tar felt installation)
- wheel barrow or large mixing bucket
- grout bag
- whisk broom
- shovel
- 4" hand grinder with a diamond blade
3. Materials
- tarred felt or weather barrier
- 2.5 pound expanded metal lathe
- Type "N" mortar compound
- mortar dye (if desired)
- special scratch-coat rake
- ledge flashing
- flashing (exterior)
4. Preparing the Surface
Weather Shield or Tarred Felt: For installing stone veneer on a basic, wood-sheathed wall a tarred felt or weather-barrier product should be installed to prevent moisture from getting though and behind the slabs. This should be "double-lapped" and will prevent rot and the disintegration of the wall. Concrete walls and brick surfaces do not require these materials or metal lath.
Flashing For reinforcement on the bottom of the stone veneer a ledge flashing is installed. The starting point for this will be a minimum of 4" above grade and 2" above any pavement. This should be leveled as it will form the line for all material going upward.
Metal Lath: When installing the metal lath make sure the grooved cups are facing upwards so that the cells will "cup" and hold the adhesive mortar. Use galvanized nails or staples and overlap the lath 2".
Scratch Coat: This first layer of mortar is called the "scratch coat" because grooves will be scratched into it to hold the second layer and stone veneer. The mortar is "keyed" into the lath and built up to a depth of ½". Then a special scratch-coat rake is used to put in the grooves.
5. Mortar Mix
A Portland cement-based mortar is commonly used as the adhesive. First the ingredients are "dry mixed" (including the tinting agent if desired) in a wheel barrow. Water is carefully added and the mortar is mixed to a pancake batter consistency. At this point the mortar will stick to the trowel when held vertically.
6. Installation
Before beginning the placement on the wall the pieces are laid out in a "dry run" to get the colour, sizes and pattern right. The corner pieces are installed first, staggered for color and texture. Since each piece is longer on one side than the other so these are alternated as the they go up the wall. The mortar is troweled onto the backs of the stone veneer pieces and pressed onto the grooved wall leaving a ½" space for grout. The spaces between the corners are filled with flat rock while the inside corners are staggered for realism.
7. Grouting
After the rocks have been in place for an hour the excess mortar is scraped out with a margin trowel. More mortar mixed in a bucket and this will be more watery so it can be squeezed into the joints with using a grout bag. When the joint mortar has dried to a sandy consistency the excess is scraped out and shaped with the grout trowel. The excess mortar is brushed off the stone veneer because washing with water might cause staining.
For great and lasting results consult a mason from our Contractor Directory or simply post your project online.
Posted by: Kim KinradeSuggested Reading For You
Masonry Contractors
Masonry contractors are responsible for laying paving stones, clay bricks granite and marble stone and gla...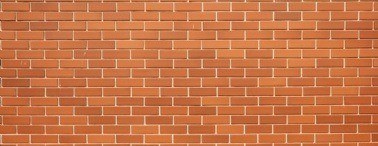
Masonry a Broad Profession with Several Sub-Specialties
Evaluating the qualification and expertise of a masonry contractor before hiring. Also included are new innova...


