
Drywalling the Basement - Uneven Foundation Wall
 2/9/2012 at 7:34:43 PM
So, I've got my basement framed and mostly drywalled... project went along pretty well without any significant hitches.
Sadly, the people who built this house did so with the least of foresight. I've encountered many parts of the basement that were put together in a very sloppy way. All of them have been worked around, but I'm having trouble coming up with a viable, cost-effective way of mitigating this latest problem.
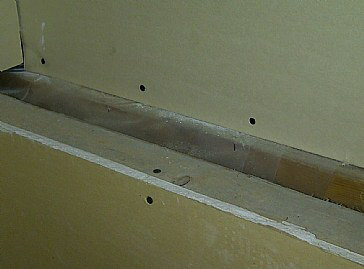
The concrete wall comes up about 4 feet from the floor, there is around a 5" ledge, and then the wall goes the rest of the way up the ceiling. This is so for the entire interior side of the exterior wall.
On top of the concrete wall are two boards... one of them (towards the exterior) is built into the framing on the exterior wall - I'm pretty sure it'd be impossible to take it out without bringing the whole house down. It is also what the vapor barrier is stapled to.
The other board is a 2"x3" that was screwed down into the concrete (towards the interior). Some of these are higher than others, which I would suspect is due to differences in the concrete height. Some are twisted pretty bad, and I may need to outright replace those.
The main problem however, is that the interior and exterior boards are not level with each other... at all. In some places there is as much as an inch of vertical difference - which means when I screw the drywall down, it'll look beyond silly, and slanted at an odd angle towards the interior.
I have considered the following options:
1) Planing down the interior 2x3 to be flat (and so that all 2x3s are at the same height), and then glueing or screwing something thin on top to make it even with the exterior board.
This seems like a huge amount of work... it might work, if I can find the right kind of 'thin thing' to add to the top of the interior 2x3.
2) Pulling the 2x3s off, and attempting to level the concrete
Not entirely sure what I'd use to level the concrete... I guess in theory I could use a circular saw with a concrete blade on it, but I'd worry about water damage, or heat damage if I didn't use water.
3) Pulling the 2x3s off, and using basement floor leveller to make an even surface
Probably the easiest, but I'd have to try and construct some kind of temporary dam around the interior edge to keep it from running onto the floor. Would also require removing all of the currently installed drywall.
 2/9/2012 at 8:14:42 PM
Hi Erik:
Not that you can't do it in time, and by getting free advice from people who do this every day, is in turn saying that I can do your job, but I get paid for mine. You are asking experienced contractors to GIVE you valued advice. This is their livElihood! why does evEryone expect something for nothing! Go out and invest in time, losses, no holidays, losing money on jobs, and then maybe you would then consider advice has been earned the hard way.
In other words get some qualified people to give you some estimates. You will in the long run, save money (providing you are to value your time and buy ALL of the tools that are necessary to do the job efficiently : could be up to around $3,000.00), save grief, enjoy your leisure time, and get on with life. These people make their living doing jobs which you are obviously not quaified to do.
Do it yourselfers who tap the experience of people who make their living doing this work just irk me.
Good luck with the FREE HARDEARNED ADVICE.
2/10/2012 at 12:33:52 AM
Thanks for your reply Chuck.
I mistook the 'Ask the Pros' link on the website to be an area where those with knowledge would be interested in sharing it (and those not interested would likely not be participating in the forum). As an IT specialist, if I happen to be researching a problem and see someone asking a question that I believe I can answer for them I'll generally answer it - why re-invent the wheel a thousand times over? As the saying goes, advice is cheap.. or at least, mine is.
Looking closer at the website, I see it is more about sourcing work out to contractors, and less about DIYers seeking advice.
Since I have misunderstood the purpose of the forum, I apologise if I have offended you and your invested time and effort and I'll ask the moderators to remove this thread at their leisure.
2/10/2012 at 7:59:33 AM
Hi Erik,
It would be hard to advise you on this without seeing the scope of work needed to be done in person, even with a detailed description. However, from your description and picture, it seems that you should make a level line from the highest point of the 2 x 3's and frame over top of it. Sorry if this doesn't help, but its best to get a visual.
On another note, As a general contractor for many years I have given FREE advise on many, many different occasions. Some of us, not all obviously, do not mind sharing our knowledge and experience. It has always worked out for the best for me to help if it doesn't take to much time.
I have made lots of money from DIY's. On occasion, the DIY realizes that the work may be to challenging and offers the job to the nice contractor who offered free advice.
Please continue to use "ask the pro's" if you need advise on your projects and good for you for trying to save a buck or two taking on this project.
I do all the work needed in my own home and my wife calls me the shoemaker with the barefoot kids. LOL
Roland
2/10/2012 at 2:35:25 PM
Hey Erik,
You have selected the right forum. We are the pro's and we are here to help. Most of us anyhow.
In these situations, I would recommend against drywalling the ledge. I would be more inclined, Like Roland mentioned, to find the high point of the 2x3 to use as a starting point. From there, I would use A long straight edge (8' would be Ideal) and a 4' level. Work your way around the entire ledge Using shims and or blocks to make a level blocked ledge. When this is complete, install a wood or Mdf ledge on top. A piece of casing or quarter round (depending on the size of the exposed opening) can then be used to cover the gap, support the interior side of your ledge, and give you a functional shelf.
This will save you removing your installed drywall, reframing the "ledge" and a considerable amount of taping and sanding. I have found when working in similar basements, that those ledges, when finished with drywall tend to not last very long. The get chipped, the tape tends to separate due to moisture and they are harder to keep clean. The wood or mdf ledge tend to be a lot more durable, and much easier to keep clean as well as adding a touch of "design". I hope this helps you in your endeavors, and should you require further advice, do not hesitate to ask. That is what these forums are for.
Al Walker,
Secure Contracting & Renovations Inc.
2/10/2012 at 5:52:54 PM
Hi Erik, +1 for Al and Roland, enough said about the first response. You ask and we will try to help.
Your photo is good but a little too close for a good idea of your situation. If you could post another one showing the wall top to bottom, we could probably generate a few more ideas for you.
I don't really understand what your objective is. There are 2 ways to deal with this and you have to decide which is the best for you, and the overall finished look of your basement.
If you just want to cap the ledge, you have to level it first to make it look right. As Al and Roland suggested, ensure the existing 2 X 3 is securely fastened and shim and fasten another one on top of it to get it level. You could then cap it with whatever you want - I like the idea of a wood shelf with an overhang - sounds like the right height for an elbow and a pop of some kind!
If you want to create a flat wall, you could remove the upper drywall and VB, and use the 2 X 3 as a bottom plate. Attach a top plate to your floor joists, plumb with the 2 X 3, and stick frame the studs (cut each one to length individually). You could add additional insulation to the top half of your wall (never a bad idea) and then re apply the VB and drywall. The only downside is you would need extension jambs for your windows but it might be a better overall look for your basement.
If you could post another photo, we might be able to help a little more.
I know you are trying to DIY this but you could put your requirements in the "post your project" section and get some local responses. Maybe you could be a helper for a day or 2 and get the project back on track.
Good Luck with it!
Jim Kuzma
Kettleby Handyman Services
PS. sounds like someone needs a hug!
2/11/2012 at 10:48:35 PM
Thank you, all of you, for your replies! You are all very helpful and the ideas are way better than mine.
Both I and my wife agree that capping it with a wood product of some kind will have a good look - and since she's the one that is doing the taping and painting, she is certainly keen on reducing that workload.
Definitely going to follow the advice of making sure that everything's fastened down tightly and then framing over top of it with an MDF cap. I think rather than using quarter-round (which I would assume would go on the exterior side of the cap, covering the gap where the cap meets the upper part of the wall), I'm going to try and use some floor moulding - might look silly, so I'll try it with a small piece first.
Search the TrustedPros directory and discover the best contractors in your area.
Find your home service pro
