
New maple hardwood stair finishing
 12/9/2012 at 11:38:52 AM
Recently had hardwood floor and stair treads installed in my home by one of your "HandyCanadian.com" contractors. We got the stain from the manufacturer of the flooring company in an effort to match it to the colour of the stairs.
The hard maple stairs are blotchy and flat looking and feel rough. We noticed when the contractors finished the nosing around the flooring (which was installed unfinished) all they did was wipe one coat of stain on it with a cloth and then a quick coat of varathane. The nosing and the stairs look completely different from the flooring.
When I asked the flooring guys they said they put a matte finish on the stairs so you wouldn't see any dust or foot prints.
My question is: When they bought the stair treads unfinished - what is the process to finish them? And what can we do to correct this?
If you would like pictures showing the difference...let me know.
12/9/2012 at 1:13:16 PM
First things you have to wipe the stairs with water, to condition them before the stain. After the first coat of stain light sanding and after the first coat of varethane another sanding.
12/9/2012 at 1:32:04 PM
Hi CJ,
Can you provide a couple images as suggested.
It sounds like the proper preparation and finish steps were not completed. Possibly the contractor was rushing to complete the project?
12/9/2012 at 1:32:23 PM
Wow !!!. Not sure about putting water on any unfinished wood. If you put water on oak it will turn black.
It is all most imposable to get the same finish as a factory finish at home. You have to be a pro to get a great finish.
I would say read all you can on the net about finishing wood and spend a lot of time doing test or hire a pro. Take a lot of time to learn this trade.
Hope this helps. PS if you put water on unfinished wood it will swell open and crack . Don,t do it is my advice.
Merry Christmas
12/9/2012 at 1:51:51 PM
We are a a professional stair reno company and I can tell you Mark is rite. You have to wet maple prior to staining it or it will not take stain. It will only get damaged if you leave water on it. Then it needs 3 coats of urathane with sanding between coats
The problem is hardwood installers are neither stair renovators nor painters and should not be involved in either.
James
12/9/2012 at 2:10:23 PM
I can't speak to the methods that your contractor used, however when we do stairs like the afore mentioned stair type we always install the unfinished stairs then finish in place as there is always fiddling around to get the best fit. We then apply 2-3 coats of stain letting each coat dry thoroughly before applying the next coat. Depending on the end finish Matte, semi-gloss or glossy depends on the urathane used. We then apply the first coat of urethane and let dry, before applying the next coat of urethane we always use steel wool usually "000" or "0000" depending on the woood used for the stairs.
What happens after you apply urethane is the natural fibers of the wood stand up, thus giving you that rough or brissely feely. The steel wool removes the fibers without removing the urethane. After this is done then the whole stair system is tack clothed then another coat of urethane is applied. If you still have a slight brissely feeling on the stairs then steel wool again and apply another coat of urethane. You will find that the stairs will turn out perfect.
Now, to fix what has been done will take a bit of work as the whole stair project needs to be sanded down to the stain and more stain needs to be applied then the urethane. If you follow my steps you should end up with a flawless job. Before you start decide what finish you want Matte, Semi gloss or glossy.
Good luck in whatever direction you decide to go.
12/9/2012 at 3:29:53 PM
First thing, are your factory floors maple? Every species of wood take stain different.
First you sand, then tack cloth the area. You lightly wet the wood so that it will take the stain evenly. Any who has stained woods like pine will agree. Apply the stain before the water dries. After the stain dries for 24 hours apply your clear finish, I usually dilute it 10-20% so you get good penetration. After it dries you will need to sand lightly again as the clear will raise the grain of the wood.
Do not use steel wool on a water based finish as over time you might get staining in the finish. Then you can apply your 2nd coat and third if needed.
As you can see there is a lot of time and work involved in a good finish, that's why it's not cheap if done properly. By the sounds of it, your going to completely strip your stairs and start over.
12/9/2012 at 4:20:16 PM
Hi,
You need to wipe your maple clean with WATER. Make sure there is no dust. Stain it; run your cloth in fibres direction and wipe off the excess. Sand lightly between each coat of urethane. There are three coats required however, you may also go up more depending on the finish desire.
Make sure stairs are not walked on for 48 hours.
Rizzo
12/9/2012 at 5:34:13 PM
Hello,
Maple is a tricky hardwood to work with due to its tight grain nature. Keeping consistency within a single staircase is very difficult especially when using different pieces of wood but can be done with attention.
The process in finishing maple hardwood is as follows;
Use a cutoff piece of a tread used within the existing staircase and sample stain for colour match, the same will have to be done with the nosing.
Prepare the wood treads by sanding using different grit sand paper from fine to finer until the stair is smooth.
Wipe the wood with a damp cloth.
Apply stain to treads with a brush (you will know how to apply the stain by the sample done early on in process, ie. number of coats, length left on each stain before wiping) and wipe with a proper staining cloth.
Apply a sanding sealer to all treads.
Sand the treads using a fine grit sandpaper.
Vacuum and clean the stairs free from any dust.
Apply two coats of any sheen varnish you desire.
I will need to see the pictures in order to access how to correct this problem.
12/9/2012 at 9:38:26 PM
Plenty of ideas have been presented and not all which I agree with. First off hardwood flooring manufactures use a different stain on custom floor pieces because nosing and reducers will not go through there normal manufacturing tooling. So they contract out to a third party supplier to produce a stain that mimics the colour they produce in the factory environment on their flooring and so it can be applied in another environment like out in the field. This is done typically for nosing's and reducers and also stair contractors.
The contractor who does the staining in the field should use this custom tinted stain and strictly follow recommended procedure (by manufacturer's third party supplier) to test on some of the original stair materials and then apply these procedures to the final product. Sounds like the contractor may have used stair manufactures stain but did not follow the recommended procedures. Another possibly is that manufacture may have misled the contractor by not informing them on the proper wood prep procedure.
OK now what? Best to have both the flooring supplier and contractor out together and compare procedures. If possible have supplier do a test in your house on part of your stairs to replicate the the desired results.
Yes now that the clear coat is applied the stain will not be easily removed in order to correct the situation
Hoe the contractor has some tricks up there sleeves to fix this one.
Mark Geier
TEMPO HARDWOOD FLOORS
Cambridge, ON
12/10/2012 at 12:46:19 AM
Well, all of you post reasonably answers to the dilemma. If the wood you are using is to match pre-finished hardwood floor, Good Luck. You will never replicate the pre-finished product. If you are finishing all wood on-site, remember that you apply and sand the floor in a different manner than on the stairs. You use a large floor sander and bulk stain and urethane on the floor. The stairs require hand finishing which is done only by skilled individuals.You should never assume anything will be the same if process is different.
Best thing to do is have the stair treads replaced now. They will be more work to try and fix them on site.
Please make sure you pre-stain them and check the finish prior to installation. Get them as close to the flooring as possible,then go forward. At the end of the day you are only losing some of the cost. Its not the end of the world and if the two parties are both in agreement, the job can be rectified in time for Christmas and everyone will be somewhat happy. If the owner is going to ask the floor layer to replace at the full cost its going to end ugly. No one wins. If some responsibility is taken by both parties you will be farther ahead.
Have the Contractor replace the installation and you purchase the nosing again. If this can not be agreed to, you will both lose lots of sleep and nothing good will come of it. Pointing fingers at this stage will only prolong what really needs to be done. Don't delay, its always best to stay on good terms with your contractor and customer. There are always lots of factors that contribute to a problem, but if you are looking to disect it peice by peice, then be prepared to remain unhappy.
12/10/2012 at 7:49:19 AM
Maple is a very hard wood, therefore stain penetration is difficult to achieve.
My advice to you at this point would be to purchase a small length of maple from a lumber store, something similar in grain to what your existing floor has. Try several stain tests. Leave stain on for different periods of time, until you achieve your desired color. Once you have achieved this, strip the areas you wish to re-do, protecting surrounding areas which you do not want refinished. Strip, sand and refinish to your desired color.
Good Luck!
12/10/2012 at 10:15:33 AM
Firstly, thank you to all who have responded to my posting.
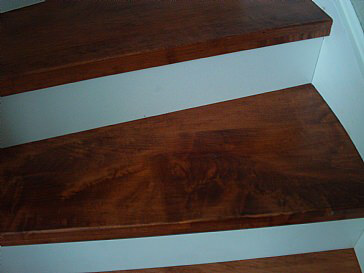
I have attached a picture which shows the stairs and the dark blotches. After reading your responses I took a closer look and noticed uneven coating on the stairs...there are many dull spots and some shiny spots.
Rick (from Glace Bay), you are right...they seemed to be rushing through the job!
James (from Coey Stairs), I spent so much time in finding the right flooring for my home and had 5 companies come to my home to give me estimates and answer questions. 2 from HandyCanadian.com.
I was so focused on the flooring and made an assumption that if they could do hardwood floors, then they could do stairs...boy was I wrong. What a mess. Although the colour is close (when it is not blocked out by the dark patches) it is the finish that is completely different. I stood and watched how it took them 10 minutes to stain the pre-finished nosing and then throw on a quick coat of varathane. I later asked if the stairs were pre-treated and they said of course. I wondered why the nosing wasn't treated as well.
James (from Phoenix), yes, I believe my flooring is "factory". They are made by a company called Silohette Flooring
Eddie (from Pine Glen), Good point - when we feel the stairs they feel really rough where the flooring is smooth. My sister's home has both smooth flooring and stairs.
Mark (in Cambridge), We ordered the flooring from a company who matches the colours of Bruce Flooring. We really liked one of their colours (Sumatra). The flooring we love. We were then advised to contact a company in Toronto (Torcan) who has the matching colour and we ordered it for the stairs/nosing.
Ben (from Barbato), there was no sanding on site for the pre-finished nosing. I think these steps and nosing were picked up from a supplier and used as is. Should there be more sanding?
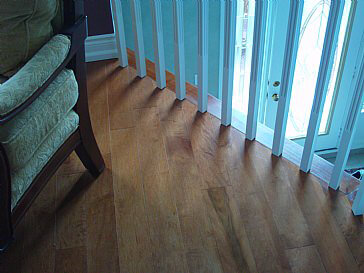
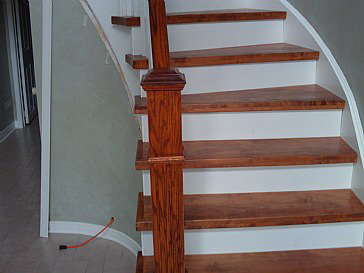
I have attached a picture of the stairs (050). I have also attached a picture of the flooring and nosing (058).
I will come back to the post to see if both pictures are posted before I send other pictures and questions.
Attn: HandyCanadian.com, Please allow these pictures to be viewed by the proper professionals who sign up on your site. I selected a company from your site to do my work and there are many issues that I have realized after hearing comments from contractor's on your site. (To be continued)
 12/10/2012 at 10:29:34 AM
I do not know if "HandyCanadian" posts more than one picture at a time so I will attach each image in a different post with my concern.
My wife and I are not fond of Oak so we went with Maple. After getting estimates we decided to keep the oak rail but to have it stained and sometime down the road we would "upgrade" to the Maple rail.
We did however order 3 Maple posts. What we received was Oak Posts. When I questioned the contractor (who was reluctant to show the posts until installing them and also a few days prior I asked the question: How did our Maple Posts turn out? - and they answered "Great") he responded by saying that you have an Oak rail so you should have Oak Posts. I asked him if he remembered that we talked about how we were switching everything over to Maple and that we would have to use the same rail until our budget permitted us to change over. He became silent. I told him that his quoted included Maple posts and he said that Maple Posts would cost twice that amount. I pulled the other estimates and all of them were within $100 of each other for the 3 Maple Posts. It was then I knew I was being, what I felt, "ripped off".
See attached picture
 12/10/2012 at 10:31:08 AM
OK, I see that they only post one picture per post....attached is stair picture.
 12/10/2012 at 10:33:17 AM
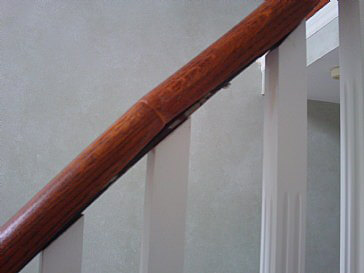
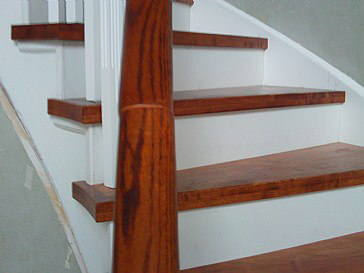
Top of hand rail - see attached. (Used to be you didn't even notice coming down the stairs with your hand sliding all the way down the rail - Not any more).
 12/10/2012 at 10:34:51 AM
Underneath Hand rail - see attached - see how the piece of steel does not sit inside the proper groove.
 12/10/2012 at 10:36:00 AM
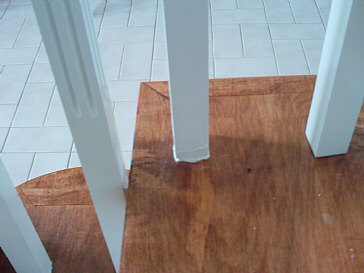
And lastly, spindles sitting in "frosted icing".
 12/10/2012 at 10:45:07 AM
After providing most of the details (trim work not included), I am at a loss and would like to ask the professionals who are registered with this site a few questions:
Is this type of work common in your industry?
Am I being unreasonable with the issues I have brought up?
In your industry what type of recourse do I have?
(Unfortunately these contractors accepted pay in milestones, when they finished the flooring I paid them for the flooring etc. I refused to make the final payment due to the install of the Oak posts and the quote showed Maple posts but by that time I did not owe very much).
Most importantly, I have to get this corrected. I am currently looking for two 3 1/2" Maple Posts and one 6" Maple post. And to have them finished properly. (I understand that they will not have the identical look but close is all we are looking for). I am also looking for someone who could give me a solution to re-do the stairs - and the costs.
Please provide any help you can.
CJ
12/10/2012 at 3:24:06 PM
Hi CJ,
The close ups of the stairs shows the wood was not conditioned prior to applying the stain. That is why you are seeing dark and light spots through out. I am confident in saying the contractor did not wet the surfacce prior to applying the stain.
I also noticed the stair railing was not properly joined. When done correctly it should be difficult to see where the two pieces were joined.
Also the paint job completed on the spindles is less then par. With the 'frosting' collecting at the bottom of the spindles shows they rushed the project. The paint was just slapped on with no regard to runs or puddling. Your pictures also show large spacing between the spindles and railing.
I am a little concerned seeing an extension cord peeking out threw a small hole in the wall as well.
The work involved in correcting this issue...well lets just say they made an absolute mess of the project. Hopefully you did not finalize payment on the project. In fact I would be after them to correct ALL issues. If the contractor does not comply then I am confident armed with the right process and pictures in court would result in a positive decision on your part.
I am sorry to be the bearer of bad news. But for a reliable and knowledgeable contractor to come back and correct all the issues I see in the pictures provided is going to cost you twice as much correct.
I have included an picture of what a finished project should like like below.
Search the TrustedPros directory and discover the best contractors in your area.
Find your home service pro
